Wednesday, November 29, 2006

Disable Remote Desktop/ Remote Assistance by GPO

Remote Desktop
Computer Configuration/ Administrative Templates/ Windows Components/ Terminal Services
Allow users to connect remotely using Terminal Services = Disable
Do not allow local administrators to customize permissions = Enable

Remote Assistance
Computer Configuration/ Administrative Templates/ System/Remote Assistance
Solicited Remote Assistance = Disable
Offer Remote Assistance = Disable

Tuesday, November 21, 2006

วิธีเปลี่ยน Port ของ Remote Desktop/ Terminal Server

ไปที่ HKEY_LOCAL_MACHINE\SYSTEM\CurrentControlSet\Control\Terminal Server\WinStations\RDP-Tcp

ที่ subkey PortNumber ให้เปลี่ยนเป็น port ที่ต้องการ เช่น 3388 (default คือ port 3389)
เสร็จแล้ว reboot ก่อน 1 ครั้ง

การ connect จากเครื่อง Client ให้ใส่ port number หลังจากชื่อหรือ ip server เช่น

192.168.0.1:4000 หรือ myserver.com:8000

Configure RDP over SSL with SelfSSL

Windows Time Services

เครื่องทุกเครื่องที่อยู่ใน Domain จะ Sync time มาจาก PDC Master แล้ว PDC Master ก็จะ Sync time มาจาก Time Server ภายนอกอีกทีปกติแล้วจะเป็น time.windows.com เราวิธีตรวจสอบว่า Sync time มาจากไหนได้จากคำสั่ง
net time /querysntp

For Windows XP
ถ้าต้องการเปลี่ยน time server ใช้คำสั่ง
net time /setsntp:pool.ntp.org
เสร็จแล้วสั่ง restart windows time service จากคำสั่ง
net stop w32time
net start w32time

For Windows Server 2003

net time /setsntp:pool.ntp.org
w32tm /config /update
w32tm /resync /rediscover /nowait

ถ้ายังไม่ได้ผลให้ลงโปรแกรม SP TimeSync ที่เครื่อง Domain Controller ที่เป็น PDC Master (หา PDC Master ได้จาก Active Directory User and Computer ตรง Operation Master) เลือก Version ที่เป็น Unicode สำหรับ Windows Server 2003

Terminal Server Performance Tweaks

The first thing to do is to override some desktop settings to reduce the amount of screen refreshes, which lowers bandwidth used, which makes the TS respond "faster". First we will remove Windows Resize Animation, when a user minimizes or maximizes a window it will be immediate, and not shrink slowly on its way down to the task bar. Open up the registry with regedit and browse to:

HKLMSYSTEMCurrentControlSetControlTerminalServerWinStationsRDP-TcpUserOverrideControl PanelDesktop

And change these values:

"AutoEndTasks" REG_SZ "1" (terminates programs that aren’t responding)
"CursorBlinkRate" REG_SZ "-1" (prevents the cursor from blinking, cutting down on screen redraws)
"DragFullWindows" REG_SZ "0" (disables "show contents" while dragging a window)
"MenuShowDelay" REG_SZ "10" (delay for showing submenus)
"WaitToKillAppTimeout" REG_SZ "20000" (number of milliseconds to wait before terminating an application that has stopped responding)
"SmoothScroll Dword" REG_DWORD "00000000" (disables smooth scrolling)
"Wallpaper" REG_SZ "(none)" (disables wallpaper)

Now browse over to:

HKLMSYSTEMCurrentControlSetControlTerminalServerWinStationsRDP-TcpUserOverrideControl PanelDesktopWindowMetrics

And change this value:

"MinAnimate" REG_SZ "0" (disables the animation when resizing a window)

If any of these keys, subkeys or values do not exist, create them. This will not really improve server performance but it will enhance the user experience and make it appear to be faster to end users, which hopefully cuts down on complaints. For your convenience I have written a REG file which you can get here. Save as tsperf.reg and run it on the terminal server.

Terminal Services Command Line Administration

Managing your Windows 2003 Terminal Server can be done faster and easier with a few simple command line tools. There are a lot of them so hang on!

Failure Codes ของ Event ID 675 และ 680 ใน Security log

Audit Account Logon - Means people connecting across the network
Audit Logon Events - Means a keyboard logon, someone at the very Domain Controller

675 Pre-authentication failed. This event is generated on a Key Distribution Center (KDC) when a user types in an incorrect password.
680 Successful or Failed logon attempt.

ถ้าต้องการจะดู Failure Codes ของ Event 675 กับ 680 จะต้องเลือกทั้ง Success และ Failuer Event

Event ID 680 จะใช้ log เหตุการณ์ success หรือ failure logon ซึ่งจะมี NT Status Code อยู่ 6 code ที่บอกรายละเอียดของ Event ID 680 นี้ เราสามารถใช้ในการตรวจสอบและแก้ปัญหาที่เกิดขึ้นได้

0xC000006A - This code means that a user has tries to log on and entered the password incorrectly.

0xC000006F - This code means that the user was prevented from logging on due to a logon time restriction.

0xC0000064 - This code appears when someone tries to logon with a non-existant account.

0xC0000070 - This code appears when a user attempts to logon to a computer that they are not allowed to logon to.

0xC0000071 - This code appears when the users password has expired.

0xC0000072 - This code appears when a user has entered the wrong password too many times and the account has been disabled.

สำหรับ Event ID 675
0x6 The username does not exist
0x17 The account has expired
0x18 Username exists, but password is wrong
0x25 Workstation's clock is out of synch

Share and NTFS permission

ตั้งแต่ Windows XP SP1 กับ Windows 2003 เป็นต้นมา จะกำหนด default share permission ให้เป็น Read Only จากเดิมที่เป็น Full Controll สำหรับ Everyone Group แต่อย่างไรก็ตามเราควรที่จะเอา Everyone ออกแล้วใส่เป็น Authenticated Users หรือ Domain Users group จะดีกว่า

นอกจากนี้ควรกำหนด NTFS Permission ที่ Root Drive ให้ Administrator มีสิทธิ Full Controll และเอา User หรือ Group อื่นออก เพิ่อความปลอดภัยและง่ายในการสืบทอดสิทธิในภายหลัง เช่น home directory เป็นต้น

Saturday, November 18, 2006

การใช้ Group Policy Security Filter apply GPO ให้กับ Group หรือ User

โดยปกติแล้ว GPO จะสามารถ apply ได้กับเฉพาะ Local PC, Domain, OU เท่านั้น แต่มีวิธีที่จะทำให้ GPO สามารถ apply ให้กับ Group หรือ User ได้โดยใช้ Group Policy Security Filter เข้ามาช่วย โดยการสร้าง GPO ขึ้นในระดับ Domain แล้วใช้การกำหนดสิทธิให้ Group/User ที่ต้องการบังคับใช้ GPO ให้มีสิทธิ Read, Apply Group Policy

1. เปิด Properties ของ Domain ขึ้นมา ไปที่ tab Group Policy Object กดปุ่ม Properties ของ GPO จะเปิด Windows ใหม่ขึ้นมา ไปที่ Security tab
2. จะเห็น Authenticated Users ได้สิทธิเป็น Read and Apply Group Policy ซึ่งจะหมายถึงทุกๆ Users ที่สามารถ Login เข้า Domain สำเร็จ จะโดนบังคับโดย GPO
3. ให้เอา check box Apply Group Policy ของ Authenticated Users ออก ให้มีสิทธิ Read ได้อย่างเดียว
4. add User หรือ Group ที่ต้องการให้ GPO มีผลบังคับใช้เข้าไป ให้มีสิทธิ Read and Apply Group Policy แทน
5. GPO จะ apply ไปบน User หรือ group นั้นเท่านั้น ถึงแม้ว่าจะเป็น Group Policy ที่สร้างขึ้นในระดับ Domain ก็ตาม

Secure Windows 2003 DC

By locking down access to the DC and its files, there are a number of Group Policy settings you should apply. The first set are located under Computer Configuration Windows Settings Security Settings Local Policies

User Rights Assignment
- Allow logon locally - allow only administrative groups i.e. Domain Admins
- Allow logon through Terminal Services - allow only administrative groups i.e. Domain Admin
- Back up files and folders - allow only administrative groups i.e. Domain Admins

Security Options
- Network access: Allow anonymous SID/Name translation - Disabled
- Network access: Do not allow anonymous enumeration of SAM accounts and shares - Enabled
- Network access: Let Everyone permissions apply to anonymous users - Disabled
- Network security: LAN Manager authentication level - Send NTLMv2 response only
- Network security: Do not store LAN Manager hash value on next password change - Enabled

Friday, November 17, 2006

Disable Windows Firewall and System Restore via GPO.

Disable Windows Firewall
เปิด GPO properties ขึ้นมาแล้วไปที่ Computer Configuration/Administrative Template/Network/Network Connection/Windows Firewall/ Domain Profile/Windows Firewall:Protect all Network Connection = disable

Disable System Restore
อยู่ที่ Computer Configuration/Administrative Template/System/System Restore/Turn Off System Restore = Enable และ Turn Off Configuration = Enable

Disable Simple File Sharing by Custom Administrative Template

;Disable Simple File Sharing by Custom Administrative Template

CLASS MACHINE
CATEGORY !!category
CATEGORY !!WindowsExplorer
POLICY !!SimpleFileSharing
KEYNAME "SYSTEM\CurrentControlSet\Control\Lsa"
EXPLAIN !!SimpleFileSharing_Explain

VALUENAME "ForceGuest"
VALUEON NUMERIC 1
VALUEOFF NUMERIC 0

END POLICY
END CATEGORY
END CATEGORY

[strings]
category="Custom Policy Settings"
SimpleFileSharing="Simple File Sharing"
WindowsExplorer="Windows Explorer"
SimpleFileSharing_Explain="Enable to enable Use simple file sharing.Disable to disable Use simple file sharing."

;end

1. save file ให้มีนามสกุลเป็น .adm แล้ว copy ไปใส่ใน folder c:\windows\inf
2. เปิด active directory user and computer ขึ้นมาเพื่อ set GPO ให้กับ OU
3. เปิด Properties ของ GPO ขึ้นมา browse ไปที่ Computer Setting/Administrative Template/ คลิกขวา เลือก Add Remove Template เลือก Add แล้ว Browse ไปที่ .adm ที่สร้างขึ้น
4. จะมี Custom Policy Setting เพิ่มขึ้นมาให้เลือก Enable/Disable Simple File Sharing ได้
5. เปิด Command Promt สั่ง gpupdate /force /target:computer เพื่อสั่งให้ Client มา update policy ใหม่ไป

Note
- Simple File Sharing จะทำ authentication โดยใช้ User = guest
- ถ้า enable simple file sharing จะทำให้มองไม่เห็นแถบ Security สำหรับเอาไว้ set permission ดังนั้นจึงควร disable simple file sharing + disable guest account

Thursday, November 16, 2006

วิธีแก้ W3073 Unable to logon as user. (USER=administrator, EC=logon failure: unknown user name or bad password.)

The W3073 is caused by the ARCserve system account password being incorrect - run up server admin and specify the correct security credentials, stop and start the services by cstop.bat and cstart.bat

Friday, November 10, 2006

การดูรายละเอียดของ User โดยใช้ Acctinfo.dll (thelazyadmin.com)

หา download ได้ฟรีจาก Windows 2003 Resource Kit แล้วสั่ง
regsvr32 %systemroot%\system32\acctinfo.dll
จะทำให้ในแถบ User Properties ของ Active Directory User and Computer มีแถบ Additional Account Info เพิ่มขึ้นมา

Thursday, October 19, 2006

Redircmp and Rediruser ย้าย Computer / User จาก Default Container ไปยัง OU อื่น

ก่อนอื่นต้องทำการ raise domain and forest functional level ให้เป็น Windows 2003 ก่อน
http://www.petri.co.il/raise_domain_function_level_in_windows_2003.htm
http://www.petri.co.il/raise_forest_function_level_in_windows_2003.htm

แล้วค่อยสั่ง

C:\WINDOWS\system32>redircmp OU=NewComputersOU,dc=YourDomain,dc=com

C:\WINDOWS\system32>redirusr OU=NewUsersOU,dc=YourDomain,dc=com

ประโยชน์ที่ได้จากการย้าย Computer/User Containner ให้มาอยู่ใน OU ก็คือเราจะสามารถบังคับใช้ GPO ได้เลยหลังจากที่ add computer เข้า domain หรือ หลังจากที่สร้าง user ขึ้นมาได้ทันที

อ่านรายละเอียดเพิ่มเติมได้จาก http://support.microsoft.com/default.aspx?scid=kb;en-us;324949

Saturday, September 16, 2006

คำสั่งเกี่ยวกับการทำ IP Alias ของ Zyxel

Q:How can I block IP routing between LAN ip-alias interfaces.

A:You can block IP routing between alias interfaces by

1. Use CI command in menu 24.8 "ip aliasdis <0,1>", where 0 is enable
route, and 1 is disable route between alias interface.

2. For some model such as P64X Series which do not support this
command. An alternative solution is to setup filter (Menu 21) to
achieve the same goal.


Q: How do I configure IP Alias using CI command?

A: See the example below

ras> ip alias enif0
The 1st alias iface is enif0:0, 2nd is enif0:1, and so on.
If the alias iface exists, you can skip this step.

ras> ip ifconfig enif0:0 202.132.154.138/24 broadcast 202.132.154.255
mtu 1500
255.255.255.0, broadcast address 202.132.154.255, mtu 1500.

ras> ip rip mode enif0:0 in [mode]

ras> ip rip mode enif0:0 out [mode]
RIP-2 only

The above CI commands can be put in autoexec.net, otherwise the settings will
be reset after power reset the router


Q: How to configure multiple LANs and route traffic among these LANs via the Prestige?

A: You can use the function 'IP Alias' which is built in Prestige.
Prestige supports three virtual LANs with its single physical
Ethernet interface. The first network can be configured in SMT menu 3.2 as usual. The second and third networks which we call 'IP Alias 1' and 'IP Alias 2' can be configured in menu 3.2.1-IP Alias Setup.

There are three internal virtual LAN interfaces for the Prestige to
route the packets from/to these three networks correctly. They are
enif0 for the major network, enif0:0 for the IP alias 1 and enif0:1
for the IP alias 2. After configuring IP alias, three routes are created automatically in Prestige as shown below.

ras> ip ro st
Dest FF Len Interface Gateway Metric stat Timer Use
192.168.3.0 00 24 enif0:1 192.168.3.1 1 041b 0 0
192.168.2.0 00 24 enif0:0 192.168.2.1 1 041b 0 0
192.168.1.0 00 24 enif0 192.168.1.1 1 041b 0 0

=======================================
ตัวอย่าง

1. หาว่า router มี interface อะไรบ้าง และใช้ interface อะไรอยู่จะได้สร้างเพิ่มได้ถูก
ras> ip ifconfig
หรือ
ras> ip ifconfig enif0
จะเห็นว่าใช้ interface ที่ชื่อว่า enif0 , enif0:0 , enif0:1 อยู่ เราต้องการสร้าง enif0:2 เพิ่ม

2. สร้าง enif0:2 เพิ่มโดยใช้คำสั่ง
ras> ip alias enif0
กลับไปดู interface ใหม่จะเห็นว่ามี enifo:2 เพิ่มขึ้นมาแล้ว แต่ยังไม่ได้กำหนด ip

3. กำหนด ip ให้กับ interface ใหม่
ras> ip ifconfig enif0:2 192.168.4.1/24 broadcast 192.168.4.255 mtu 1500
กลับไปดู interface ใหม่ คราวนี้จะเห็นว่า enif0:2 มี ip address แล้ว

4. กำหนดเกี่ยวกับการ route ของ ip alias ที่สร้างขึ้นมาใหม่ (Option อาจจะไม่ต้องใส่ก็ได้)
ras> ip rip mode enif0:2 in [0-3]
ras> ip rip mode enif0:2 out [0-3]

mode = 0,1,2,3

5. ดู rip mode ของ interface ทั้งหมด
ras> ip rip status

6. block IP routing ระหว่าง alias interfaces เพื่อความปลอดภัยไม่ให้แต่ละ ip alias มองเห็นกันได้
ras> ip aliasdis 1
0 = enable route between alias interface
1 = disable route between alias interface

7. ใส่คำสั่งพวกนี้ลงใน autoexec.net ด้วย ไม่งั้นเวลาที่ reboot แล้วพวก setting เหล่านี้จะหายไปหมด

Tuesday, August 22, 2006

การทำ VPN Site to Site โดยใช้ Zyxel Router

รุ่นที่สามารถทำ VPN Site to Site ได้เช่น
650H 10 vpn
661H 2 vpn
662H 20 vpn
792H 10 vpn

สิ่งสำคัญก็คือที่แต่ละสาขาจะต้องใช้ Subnet ไม่ซ้ำกันเช่น 192.168.1.x , 192.168.2.x, ...

ค่า Parameter ที่ต้องใส่คือ
1. Name คือชื่อของ VPN ใส่ให้สื่อความหมาย เช่น HQ to Office

2. Local ให้ใส่ IP Subnet ของ Local Network ก็คือ IP ของ Network ที่อยู่หลัง Router นั่นเอง

3. Remote คือ Subnet ของฝั่ง remote

4. Security Gateway Address สามารถใส่ได้ทั้ง IP และ DNS หรือ DDNS

5. Pre-Share Key อย่างต่ำ 8 ตัวอักษร แต่ใส่ยิ่งยาวยิ่งดี

ถ้า Config ในหน้า Web แล้วมีปัญหา Router ค้าง ก็ให้ใช้วิธี Telnet เข้า Menu 27 ใส่ Parameter ตามข้างบน ก็ได้เหมือนกัน

Note

- VPN ที่สร้างขึ้นถ้าไม่มีการส่งข้อมูลกันนานกว่า 2 นาทีจะถูกตัดออก ต้องเข้าหน้า CLI ไปสั่ง
ras> ipsec timer chk_conn 0 (0 = never disconnect)
- ถ้ามีการใช้ DDNS สายตัดแล้ว IP เปลี่ยนจะต้องใช้เวลา 15 นาทีกว่าที่ Zyxel จะ update peer ip ให้ เราสามารถสั่งให้ update เร็วกว่านี้ได้จากคำสั่ง
ras> ipsec timer update_peer 5 (น้อยที่สุดคือ 5 นาที)
- เราสามารถบังคับให้เชื่อมต้อ VPN กันได้โดยใช้คำสั่ง
ras> ipsec dial 1 (1 = vpn แรกที่ set ค่าเอาไว้)
- ถ้าฝั่ง local หรือ remote ใช้ ddns ก่อนสั่ง dial เราควรที่จะ update peer ip ก่อนโดย
ras> ipsec updatePeerIp
- command line พวกนี้ถ้า reboot router แล้วจะหายไป จึงต้องเอาไปใส่เอาไว้ใน autoexec.net ถ้าต้องการใช้จำค่าตลอดไป

Monday, August 21, 2006

การแก้ไข autoexec.net ของ Zyxel Router

http://weyoon.googlepages.com/zynos_newcommands.html

telnet เข้าไปใน router เข้าเมนู 24 -> 8 แล้วพิมพ์
sys edit autoexec.net
กด n ไปจนเห็นบันทัดที่ต้องการเพิ่มต่อจากนั้น
กด i (insert) แล้วพิมพ์ว่า
poe ter on (สั่งให้ terminate pppoe ก่อนที่จะ connect ใหม่)

ip nat loopback on (ทำให้สามารถ resolve DDNS host จากทางฝั่งขา LAN ได้)

ถ้าต้องการลบ ให้กด n ไปจนเห็นบันทัดที่ต้องการลบ แล้วกด d แล้วกด x เพื่อ save ออกมาดูก่อน

กด x (save)
sys view autoexec.net
ตรวจสอบว่าบันทัดที่แก้ไขอยู่ใน autoexec.net เรียบร้อยดีแล้ว ก็ Reboot Router

การตรวจสอบ NAT Session
สำหรับ Router รุ่นเก่า

ใช้คำสั่ง ip if เพื่อดู interface ของ WAN
ras> ip if
ปกติจะได้ค่าเป็น wanif0
ras> wan nat iface wanif0 st
ดูตรง Table Size

สำหรับ Router รุ่นใหม่ๆ
ras> ip nat session
ดูว่า Session ที่ใช้ไปเท่าไหร่
ras> ip nat ha wanif0

การสั่ง reboot
ras> sys reboot

การ set timeout ตอนที่อยู่ใน command line
ras> sys stdio 15

ถ้าไม่ต้องการให้หลุดจาก telnet
ras> sys stdio 0

ออกจาก CLI กลับมาที่ DOS โดยไม่ต้องผ่าน SMT
ras> sys quit

สรุป คำสั่งที่ควรใส่ใน autoexec.net
poe ter on = terminate pppoe ก่อนที่จะ connect ใหม่
ip nat loopback on = ทำให้สามารถ resolve DDNS host จากทางฝั่งขา LAN ได้
ip aliasdis 1 = disable routing between alias interface
ipsec timer chk_conn 0
ipsec timer update_peer 5
sys ddns restart wanif0 = สั่งให้ update wanip กับ DDNS
ip nat session 2048 [per host] สำหรับ firmware รุ่นใหม่อาจจะได้มากกว่านี้

Monday, August 07, 2006

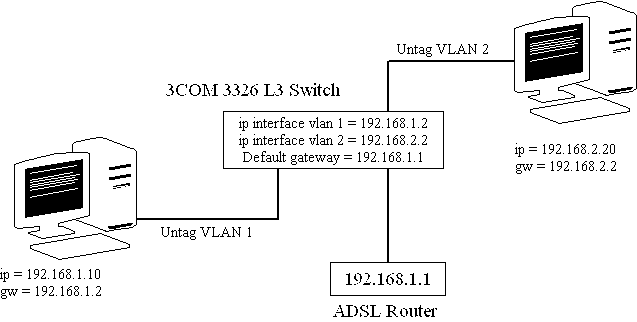
VLAN อย่างง่าย ใช้ได้แน่นอน


จะเห็นว่าที่เครื่อง Client จะ set Default Gateway ชี้ไปที่ IP Interface ของ VLAN ที่มันอยู่(ไม่ใช่ IP ของ ADSL Router) แล้ว Default Gateway ของ L3 Switch ค่อยชี้ไปที่ ADSL Router อีกที คิดง่ายๆว่ามี L3 Switch ก็คือ Router ตัวนึงซึ่งมี 2 Interface แล้วเอามาต่อกับ Router อีกตัวคือ ADSL Router นั่นเอง

Note:
untaged vlan 1 + tagged vlan 2 != untagged vlan 2 + tagged vlan 1