Showing posts with label Network Configuration. Show all posts

Tuesday, June 19, 2007

Example of Subnet on Cisco Router

สมมุติว่าเช่า lease line มา 1 link ความเร็ว 1Mb ISP ได้ให้ public ip มา 1 block เช่น

203.155.33.136/29 จะมี ip ที่เราสามารถนำมาใช้ได้ดังนี้

จะเห็นว่า IP ที่สามารถนำมาใช้ได้คือ .137 - .142 เท่านั้น และเป็น directly connected กับ eth0 ดังนั้นdestination ip ที่อยู่ใน subnet นี้สามารถเอาไปใช้กำหนดให้กับ server ภายในบริษัทได้เลย ในกรณีที่ไม่มี firewall มาคั่น

ถ้าที่ router มีการทำ NAT เช่น

ip nat pool mypool 203.155.33.138 203.155.33.140 netmask 255.255.255.248
ip nat inside source list 7 pool mypool overload

จะเหลือ ip ที่นำมาใช้งานได้คือ .137, .141, .142 เท่านั้น
ถ้าเรามี Firewall ภายในที่ไม่ได้ใช้งานใน mode Transparent (bridge mode) เราก็จะเสียไปอีก 1 ip เช่น .141

เราจะเสียไปอีก 1 ip สำหรับ ethernet0 เช่น .137

interface Ethernet0
description LAN
ip address 192.168.1.1 255.255.255.0 secondary <--- ทำเอาไว้ bypass firewall เผื่อพัง
ip address 203.155.33.137 255.255.33.248
ip accounting output-packets
ip nat inside
no ip route-cache
no ip mroute-cache
ip policy route-map RAGserver

สรุปว่าจะเหลือแค่ .142 เอาไว้ใช้สามารถ publish server ภายในได้
แต่ในความเป็นจริงเราสามารถใช้ ip firewall .141 เพียง ip เดียว publish server ภายในได้เป็นสิบๆ
Monday, June 18, 2007

การเปลี่ยน Cisco Router Password

การเปลี่ยน Password ที่ใช้เข้าสู่ enable mode
Router> en
Router# config t
Router(config)# enable secret [passwd2550]

การเปลี่ยน Password ที่ใช้ในการ Telnet เข้า Router
Router(config)# line vty 0 4
Router(config-line)# login
Router(config-line)# password [passwd2550]

การเปลี่ยน Password ที่ใช้ในการเข้า Router จาก console
Router(config)# line con 0
Router(config-line)# login
Router(config-line)# password [passwd2550]

เมื่อเปลี่ยน password เสร็จแล้วสั่ง save config โดยใช้คำสั่ง
Router# copy run start

สั่ง Reboot Router โดยคำสั่ง
Router# reload

คำสั่งดู routing table
Router# show ip route

Sunday, April 29, 2007

Reboot Router from wget command line

ทดสอบใช้ได้กับ router Zyxel ส่วนยี่ห้ออื่นก็ไม่ต่างกัน

http://gnuwin32.sourceforge.net/packages/wget.htm
http://www.ieinspector.com/httpanalyzer/download.html
download version standalone มาจะดีกว่าเพราะสามารถดูผลได้จากการสั่งผ่าน IE หรือ Command line ก็ได้

วิธีที่ 1
wget --user=username --password=password --post-data IsReset=1 http://192.168.15.2/Forms/DiagGeneral_2
ข้อดีของการใช้ option --user ,--passwd ก็คือจะไม่มีปัญหากับ user หรือ password ที่มีตัวอักษรแปลกๆ

หรือ
wget --post-data IsReset=1 http://username:password@192.168.15.2/Forms/DiagGeneral_2

วิธีที่ 2 กรณีที่ไม่ต้องการให้รู้ว่า user/pass คืออะไรโดยทำการ encode user/pass ก่อน (แต่ก็มีวิธีการ decode ได้)
wget -E --header="Authorization: Basic ZnJlZDp0aGF0cyBtZQ==" --post-data IsReset=1 http://192.168.15.2/Forms/DiagGeneral_2

วิธีที่ 3 ใช้ autoit script

AutoItSetOption("WinTitleMatchMode",2)
AutoItSetOption("SendKeyDownDelay",50)

Run("cmd.exe","",@SW_MAXIMIZE)
sleep(1000)

WinActivate("cmd.exe")
WinWaitActive("cmd.exe")

Send("telnet 192.168.1.1{ENTER}")
Sleep(500)
Send("password{ENTER}")
Sleep(500)

Send("24{ENTER}")
Sleep(500)
Send("8{ENTER}")
Sleep(500)
Send("sys reboot{ENTER}")

Thursday, December 07, 2006

Tomato Firmware

http://www.polarcloud.com/tomato
เป็น firmware ที่เสถียรดีมาก
สามารถสั่ง schedule reboot ได้จาก cron โดยใช้คำสั่ง ในหน้า Web Config/Administration/Scripts/Init
# cru a boot "0 0 * * * /sbin/reboot"
จะ reboot ตอนเที่ยงคืนของทุกๆวัน

Cron Utility
add: cru a <"min hour day month week command">
delete: cru d
list: cru l

Saturday, September 16, 2006

คำสั่งเกี่ยวกับการทำ IP Alias ของ Zyxel

Q:How can I block IP routing between LAN ip-alias interfaces.

A:You can block IP routing between alias interfaces by

1. Use CI command in menu 24.8 "ip aliasdis <0,1>", where 0 is enable
route, and 1 is disable route between alias interface.

2. For some model such as P64X Series which do not support this
command. An alternative solution is to setup filter (Menu 21) to
achieve the same goal.


Q: How do I configure IP Alias using CI command?

A: See the example below

ras> ip alias enif0
The 1st alias iface is enif0:0, 2nd is enif0:1, and so on.
If the alias iface exists, you can skip this step.

ras> ip ifconfig enif0:0 202.132.154.138/24 broadcast 202.132.154.255
mtu 1500
255.255.255.0, broadcast address 202.132.154.255, mtu 1500.

ras> ip rip mode enif0:0 in [mode]

ras> ip rip mode enif0:0 out [mode]
RIP-2 only

The above CI commands can be put in autoexec.net, otherwise the settings will
be reset after power reset the router


Q: How to configure multiple LANs and route traffic among these LANs via the Prestige?

A: You can use the function 'IP Alias' which is built in Prestige.
Prestige supports three virtual LANs with its single physical
Ethernet interface. The first network can be configured in SMT menu 3.2 as usual. The second and third networks which we call 'IP Alias 1' and 'IP Alias 2' can be configured in menu 3.2.1-IP Alias Setup.

There are three internal virtual LAN interfaces for the Prestige to
route the packets from/to these three networks correctly. They are
enif0 for the major network, enif0:0 for the IP alias 1 and enif0:1
for the IP alias 2. After configuring IP alias, three routes are created automatically in Prestige as shown below.

ras> ip ro st
Dest FF Len Interface Gateway Metric stat Timer Use
192.168.3.0 00 24 enif0:1 192.168.3.1 1 041b 0 0
192.168.2.0 00 24 enif0:0 192.168.2.1 1 041b 0 0
192.168.1.0 00 24 enif0 192.168.1.1 1 041b 0 0

=======================================
ตัวอย่าง

1. หาว่า router มี interface อะไรบ้าง และใช้ interface อะไรอยู่จะได้สร้างเพิ่มได้ถูก
ras> ip ifconfig
หรือ
ras> ip ifconfig enif0
จะเห็นว่าใช้ interface ที่ชื่อว่า enif0 , enif0:0 , enif0:1 อยู่ เราต้องการสร้าง enif0:2 เพิ่ม

2. สร้าง enif0:2 เพิ่มโดยใช้คำสั่ง
ras> ip alias enif0
กลับไปดู interface ใหม่จะเห็นว่ามี enifo:2 เพิ่มขึ้นมาแล้ว แต่ยังไม่ได้กำหนด ip

3. กำหนด ip ให้กับ interface ใหม่
ras> ip ifconfig enif0:2 192.168.4.1/24 broadcast 192.168.4.255 mtu 1500
กลับไปดู interface ใหม่ คราวนี้จะเห็นว่า enif0:2 มี ip address แล้ว

4. กำหนดเกี่ยวกับการ route ของ ip alias ที่สร้างขึ้นมาใหม่ (Option อาจจะไม่ต้องใส่ก็ได้)
ras> ip rip mode enif0:2 in [0-3]
ras> ip rip mode enif0:2 out [0-3]

mode = 0,1,2,3

5. ดู rip mode ของ interface ทั้งหมด
ras> ip rip status

6. block IP routing ระหว่าง alias interfaces เพื่อความปลอดภัยไม่ให้แต่ละ ip alias มองเห็นกันได้
ras> ip aliasdis 1
0 = enable route between alias interface
1 = disable route between alias interface

7. ใส่คำสั่งพวกนี้ลงใน autoexec.net ด้วย ไม่งั้นเวลาที่ reboot แล้วพวก setting เหล่านี้จะหายไปหมด

Tuesday, August 22, 2006

การทำ VPN Site to Site โดยใช้ Zyxel Router

รุ่นที่สามารถทำ VPN Site to Site ได้เช่น
650H 10 vpn
661H 2 vpn
662H 20 vpn
792H 10 vpn

สิ่งสำคัญก็คือที่แต่ละสาขาจะต้องใช้ Subnet ไม่ซ้ำกันเช่น 192.168.1.x , 192.168.2.x, ...

ค่า Parameter ที่ต้องใส่คือ
1. Name คือชื่อของ VPN ใส่ให้สื่อความหมาย เช่น HQ to Office

2. Local ให้ใส่ IP Subnet ของ Local Network ก็คือ IP ของ Network ที่อยู่หลัง Router นั่นเอง

3. Remote คือ Subnet ของฝั่ง remote

4. Security Gateway Address สามารถใส่ได้ทั้ง IP และ DNS หรือ DDNS

5. Pre-Share Key อย่างต่ำ 8 ตัวอักษร แต่ใส่ยิ่งยาวยิ่งดี

ถ้า Config ในหน้า Web แล้วมีปัญหา Router ค้าง ก็ให้ใช้วิธี Telnet เข้า Menu 27 ใส่ Parameter ตามข้างบน ก็ได้เหมือนกัน

Note

- VPN ที่สร้างขึ้นถ้าไม่มีการส่งข้อมูลกันนานกว่า 2 นาทีจะถูกตัดออก ต้องเข้าหน้า CLI ไปสั่ง
ras> ipsec timer chk_conn 0 (0 = never disconnect)
- ถ้ามีการใช้ DDNS สายตัดแล้ว IP เปลี่ยนจะต้องใช้เวลา 15 นาทีกว่าที่ Zyxel จะ update peer ip ให้ เราสามารถสั่งให้ update เร็วกว่านี้ได้จากคำสั่ง
ras> ipsec timer update_peer 5 (น้อยที่สุดคือ 5 นาที)
- เราสามารถบังคับให้เชื่อมต้อ VPN กันได้โดยใช้คำสั่ง
ras> ipsec dial 1 (1 = vpn แรกที่ set ค่าเอาไว้)
- ถ้าฝั่ง local หรือ remote ใช้ ddns ก่อนสั่ง dial เราควรที่จะ update peer ip ก่อนโดย
ras> ipsec updatePeerIp
- command line พวกนี้ถ้า reboot router แล้วจะหายไป จึงต้องเอาไปใส่เอาไว้ใน autoexec.net ถ้าต้องการใช้จำค่าตลอดไป

Monday, August 21, 2006

การแก้ไข autoexec.net ของ Zyxel Router

http://weyoon.googlepages.com/zynos_newcommands.html

telnet เข้าไปใน router เข้าเมนู 24 -> 8 แล้วพิมพ์
sys edit autoexec.net
กด n ไปจนเห็นบันทัดที่ต้องการเพิ่มต่อจากนั้น
กด i (insert) แล้วพิมพ์ว่า
poe ter on (สั่งให้ terminate pppoe ก่อนที่จะ connect ใหม่)

ip nat loopback on (ทำให้สามารถ resolve DDNS host จากทางฝั่งขา LAN ได้)

ถ้าต้องการลบ ให้กด n ไปจนเห็นบันทัดที่ต้องการลบ แล้วกด d แล้วกด x เพื่อ save ออกมาดูก่อน

กด x (save)
sys view autoexec.net
ตรวจสอบว่าบันทัดที่แก้ไขอยู่ใน autoexec.net เรียบร้อยดีแล้ว ก็ Reboot Router

การตรวจสอบ NAT Session
สำหรับ Router รุ่นเก่า

ใช้คำสั่ง ip if เพื่อดู interface ของ WAN
ras> ip if
ปกติจะได้ค่าเป็น wanif0
ras> wan nat iface wanif0 st
ดูตรง Table Size

สำหรับ Router รุ่นใหม่ๆ
ras> ip nat session
ดูว่า Session ที่ใช้ไปเท่าไหร่
ras> ip nat ha wanif0

การสั่ง reboot
ras> sys reboot

การ set timeout ตอนที่อยู่ใน command line
ras> sys stdio 15

ถ้าไม่ต้องการให้หลุดจาก telnet
ras> sys stdio 0

ออกจาก CLI กลับมาที่ DOS โดยไม่ต้องผ่าน SMT
ras> sys quit

สรุป คำสั่งที่ควรใส่ใน autoexec.net
poe ter on = terminate pppoe ก่อนที่จะ connect ใหม่
ip nat loopback on = ทำให้สามารถ resolve DDNS host จากทางฝั่งขา LAN ได้
ip aliasdis 1 = disable routing between alias interface
ipsec timer chk_conn 0
ipsec timer update_peer 5
sys ddns restart wanif0 = สั่งให้ update wanip กับ DDNS
ip nat session 2048 [per host] สำหรับ firmware รุ่นใหม่อาจจะได้มากกว่านี้

Monday, August 07, 2006

VLAN อย่างง่าย ใช้ได้แน่นอน


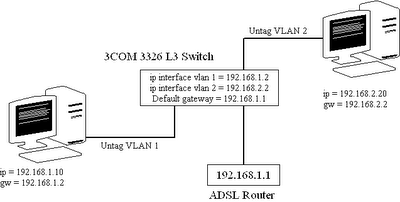
จะเห็นว่าที่เครื่อง Client จะ set Default Gateway ชี้ไปที่ IP Interface ของ VLAN ที่มันอยู่(ไม่ใช่ IP ของ ADSL Router) แล้ว Default Gateway ของ L3 Switch ค่อยชี้ไปที่ ADSL Router อีกที คิดง่ายๆว่ามี L3 Switch ก็คือ Router ตัวนึงซึ่งมี 2 Interface แล้วเอามาต่อกับ Router อีกตัวคือ ADSL Router นั่นเอง

Note:
untaged vlan 1 + tagged vlan 2 != untagged vlan 2 + tagged vlan 1

Thursday, July 06, 2006

NTP Server ที่อยู่ในไทย

clock.nectec.or.th หรือ 202.44.204.9
ntp1.cat.net.th
ntp2.cat.net.th

แบบ ramdom ทั่วโลก
pool.ntp.org